Do you blog? Of course you do. Does your company have a blog? Most likely.
If you’re putting time and effort into your blog posts, you want them to generate the maximum amount of engagement and traffic. It is rumoured that WordPress powers around 20% of the web, so in this post, I’ll share a few hints and tips to make sure your WordPress blog posts look awesome across both social media platforms, and on Google.
To get the most mileage out of every blog post, you need to optimise a few elements of your content so it looks great on each social network, stands out, and gives you brand consistency across each platform.
While many websites rely on adding rich snippets to the HTML, as WordPress users we have almost unlimited options when it comes to easy-to-use plugins for content optimisation. Here are our top tips to make your WordPress blog posts look great, and make that effort worthwhile:
1) Implement Twitter Cards
Whenever someone shares content from your website on Twitter, you want it to generate the maximum visibility possible. Unfortunately, a lot of the tweets look mediocre and dull. Twitter Cards make it possible for you to have rich media elements, and a link to your Twitter handle included with each tweet of your content. You can see the difference in the images below, from a site that doesn’t use Twitter cards, and a tweet from a site that is using Twitter cards.

In the above tweet, you see the title, description and featured image for the blog post that was shared. You can also see the author’s Twitter handle (@LukeLewis) and a link to the content (‘View on web’). If you would like this functionality on your own WordPress site, Twitter recommends the following plugins.
Jetpack plugin – this will be familiar to WordPress users as it’s a part of the free version of their blogging platform and has dozens of other feature enhancements for WordPress.
JM Twitter Cards — A simpler plugin that only handles Twitter card implementation.
WordPress SEO by Yoast — One of the top SEO plugins that also handles Twitter Cards, Facebook Open Graph and Google+ authorship.
Once you’ve installed the plugin of your choice, you can validate your content by using the Twitter Card Validator. After you sign in with your Twitter account, click the Validate & Apply tab and test a link from your website. You should see that the tags check out and a button to request approval from Twitter to use Twitter cards. Once your website has been approved, tweets from your website will have rich media summaries on Twitter, just like the 8MS blog, and the example shown above.
2) Use The Facebook Open Graph Protocol
Whenever you share a blog post on Facebook, you have the option to edit the link’s title, description and preview image. Often, many users fail to edit the title, description and link, which can mean cut-off titles, random images and a weak description which doesn’t explain or suit the content you are sharing.

Implementing Facebook Open Graph protocol allows you to control exactly what is posted on Facebook from your link. Facebook recommends using the official Facebook plugin for Open Graph protocol integration.
In addition to crafting the perfect updates for Facebook, it also allows you to learn more about your audience and those who share your content through Facebook Insights. Alternatively, you can use the WordPress SEO by Yoast mentioned earlier, to implement Facebook Open Graph code.
3) Customise The Text for Any Social Share
If you can’t or don’t want to implement Twitter cards or the Open Graph Protocol for Facebook, but still want to control the text that is shared on social networks, WordPress SEO by Yoast is the answer. Again.
This relies on you using the SEO title tag and meta description that you enter for each post. For example, see the following SEO title and meta description entries:

This title and description will be used on Facebook, LinkedIn, Google+ (title only), Pinterest (title only as description for image) and other social networks. You can easily preview what text will show in shares and search results.
Whilst it’s not guaranteed, the SEO title and meta description will also likely be used in Google’s search results. So even if you don’t or can’t implement Twitter cards and Facebook Open Graph, do this. It helps control how your posts appear when they’re shared on social networks and when they show in search results.
4) Use Social Sharing Buttons
This sounds obvious, but a great way to encourage people to share your content is to install the official social sharing buttons from top networks on your content pages. Whilst you can add social sharing buttons manually into your WordPress template using the coding provided by Twitter, Facebook, LinkedIn, Google+ and other popular networks, you can do it much faster using plugins like Simple Share Buttons.
Another plugin is Digg Digg. This plugin allows you to quickly add your social sharing buttons as a floating toolbar to the left, right, top or bottom of your content. When you set up Digg Digg, be sure to visit the Global Config to add your Twitter username to any Twitter sharing button you place on your website. This will ensure that your @username is included with any tweets of your content.
5) Use Google Schema & Authorship
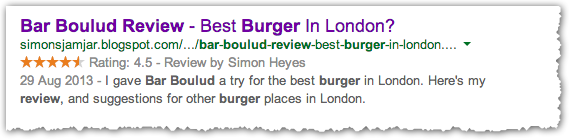
Google Schema (Schema.org) allows you to ‘mark-up’ different content elements within your blog post. Using schema (or rich snippets) is a great way to optimise your presence on the search results as snippets can include review stars, a video, an article or a photo next to your listing on Google, as shown in my blog example below.
Whilst authorship has effectively now been removed from Google’s SERPs, listings can still link through to your Google+ profile. Even if it gives you an extra 20px of real-estate space, it’s worth connecting your content to your author name, so stick with Google+ and make sure you are seen as a ‘contributor’ to your own blog.
Google has a ‘Structured Data Testing Tool‘ which you can use to see if your schema and authorship has been validated correctly.
6) Set Up A Favicon
I’m a big fan of brand consistency. Logos, colours, imagery…all content assets should tie back to the style of your site and/or brand. All too often I see fantastic blogs that don’t have a favicon set up. What is a favicon? It’s a tiny version of your site logo that sits in the tabs of your browser. Even if you don’t have a logo, you can create a small coloured icon that reflects your blog or brand. The image below shows what I see when using Chrome.

There are many plugins to help you set up a favicon, such as the All In One Favicon. Most modern WordPress themes should have a setting that allows you to upload a favicon.
Anyone reading your blog should be given a great brand experience. The favicon – in my eyes – is part of that experience.
7) Generate Your Own Branded Short Domain
This final tip is the icing on the cake when it comes to brand consistency. Most URLs shared on Twitter are automatically shortened to a t.co URL. You may have also noticed WordPress shortens your post URLs to a ‘wp.me‘ URL. Other URL shorteners include Ow.ly, Bit.ly and Goo.gl.
Many blogs and brand sites have started to create their own branded short domain, which spits out branded short URLS. Not only do these look great when shared across social platforms, they also help keep that brand consistency vibe going. Below are a few sites that have implemented a branded short URL.

Anyone can create a branded short domain using Bitly. They have a detailed article on how to set up a branded short domain. Simply look on Domai.nr for the short domain you want, buy it using your web host or domain provider, and follow Bitly’s instructions to complete the set up.
There you have it. Great looking, branded WordPress blog posts. If you have any additional plugins or tips to help make WordPress posts look awesome, please add them in the comments below.